| WDT: Tools University Menu | |||||||||||||||||||||
|
|||||||||||||||||||||
| Organizational Menu | About Menu | University Menu | Path Crawler | File Icons | Files | | |||||||||||||||||||||
| Description (DRAFT Ver:1-FEB03)
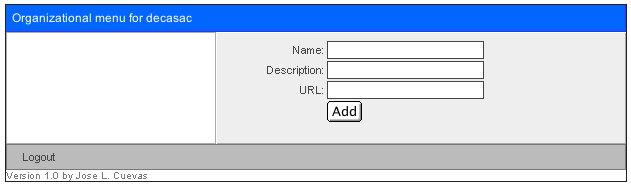
The organizational menu is designed by a person assigned at the faculty or organization using the tools provided here. Websites under this organization will have access to the same menus which can be easily edited by the organization and changes will reflect across the child websites. For additional information about the Organizational Menu read the institutional DESIGN policy. The University Menu is essential to preserve the navegation through the portals in the uprm site. Getting Ready The Organizational Menu must be implemented by the different Faculties, Deans Offices and other offices. The person in charge of the menu must request an account from the WDT to create and manage his or her organizational menu. To request an account contact the WDT by email at wmaster@uprm.edu or by phone at extensions 3312 or 2055. Once you have an account you can login at http://www.uprm.edu/app/orgmnu/login.php. Here you will login using the email address and password that you provided for the registartion. In the log in screen you will be prompted for the ORGANIZATION. The organization is the name of your organization, the same one you provided in the registration. It must be entered exactly as recorded in your registration (this case sensitive). The organization is required since a person can be in charge of more than one menu. The log in screen will take you to the EDITOR screen. The first time you will get a screen like this:
Since you have no items in your menu the system is prompting you to add a new item. ADDING A NEW ITEM: The NAME is the actual name that users will see in the menu. The DESCRIPTION is the tooltip that appears when the users hovers this item with the mouse. The URL is the absolute link to this item. An absolute URL starts from the HTTP://. You can easily copy and paste the full url from the address bar in your browser. Once the information is ready just click save. You can add a section header (not a link) by leaving the URL in blank. Once you add a record you will get the following screen:
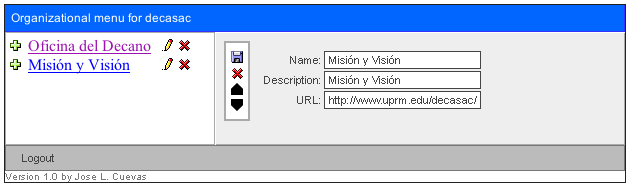
The right side of the screen has a list of all the items in your menu. THE ITEM LIST: The item list is where you can insert new items, edit an item, and delete an item. These actions are performed by clicking on their respective icons. The PLUS icon will insert an item bellow the item clicked. The PENCIL icon will bring the editor screen where you can edit the different fields and re-order the item by moving it up or down. The X icon deletes the item. You can test the item by clicking on the link. When you click on the PENCIL icon to edit the item you get the following screen:
The editor screen is pretty much like the add screen the only difference is the icons on the side. The FLOPPY icon saves the changes made. The X deletes the current record. The UP and DOWN icons move the actual location of the item within the menu. Using the Organizational Menu in your pages To insert the organizational menu in your pages all you have to do is insert a small JavaScript in each page. The javascript will call an external javascript provided by the ORGMNU tool. This javascript will generate a table 130 pixels wide. The Organizational Menu is meant to be placed on the right side of the page. Check the template provided by the WDT for more information on the placement of the Organizational Menu. Each Organizational menu is given an unique ID also called the "MENU ID". This ID is required in orther to tell the orgmnu tool which menu to return. If your menu id is 1, You will place the following JavaScript in each page:
The orgmnu tool requires only one argument to fetch the proper menu: orgmnu.php?mnuid=1
|
|||||||||||||||||||||
| Last Revision: Nov 02, WDT, wmaster@uprm.edu |
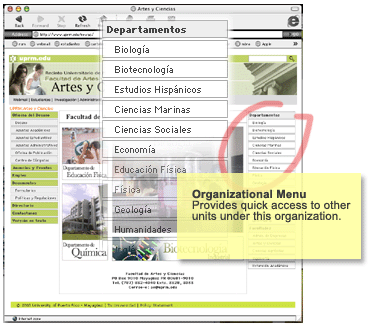 The Organizational Menu is an interface element that allows users to access different units in a faculty, office or other organization. Every page within the organization will share this menu. For example the Faculty of Arts and Sciences has on their organizational menu links to all the departments in their faculty and links to other faculties. This menu is shared among the departments and offices in the Arts and Science faculty. This way, users visiting the Biology homepage will have access to other departments and other information that otherwise was unknown.