Overview

The Puerto Rico Seismic Network (PRSN) Evacuation Maps and Map Tool include a series of features and options that may seem daunting. This module focuses on using these tsunami maps, including the differences between the maps, when to use each, and how to use the interactive Map Tool features. 

Module Objectives

After completing this module, you will be able to:

    • Describe when to use the PRSN evacuation maps and the Map Tool, including their differences and features.
    • Measure distance and estimate travel time on the Map Tool (feature is only available for a few coastal municipalities on the map).

When to Use the Evacuation Maps and Map Tool

The PRSN map resources were originally developed for emergency management personnel, but anyone in the community can find useful information on these maps. First, it is important to know when to use each type of map.


Evacuation Maps

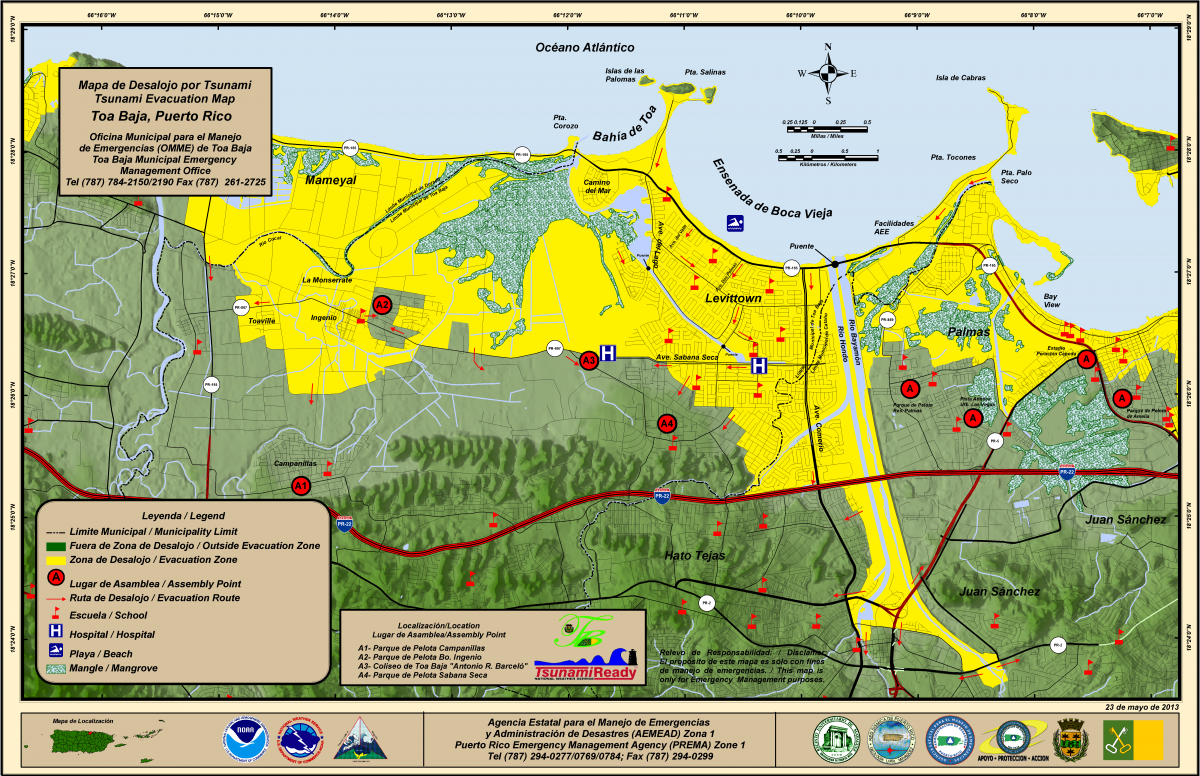
PRSN has a repository of local evacuation maps for coastal municipalities and two inland municipalities in Puerto Rico as well as the U.S. Virgin Islands. Although the Map Tool also contains Key Symbols, the municipal evacuation maps contain the most important information to have easy access to in an emergency. This includes the assembly points and locations, the general direction of evacuation routes, and contact information for emergency management services. At the least, you should print your municipality’s evacuation map for your emergency backpack.


Map Tool

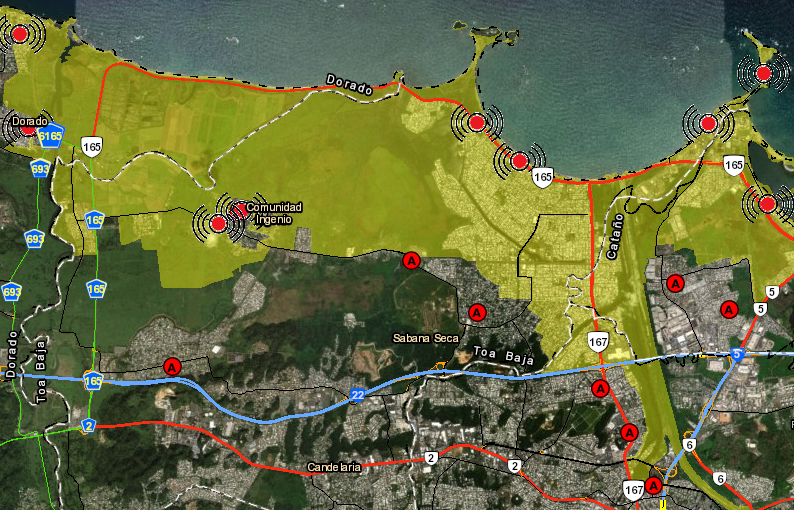
The Map Tool shows a full satellite image of Puerto Rico and has several interactive features discussed below. Importantly, you can zoom in on the Map Tool to see your local area in more detail than in the municipal evacuation maps. Using the interactive features, you can customize the image to fit your unique needs and situation: you can use the Map Tool to create your own personal evacuation map and print it for your emergency backpack.


The images below are examples of these maps. Both images are maps of the municipality of Toa Baja, Puerto Rico; however, the image on the left is from the PRSN’s evacuation maps repository, and the image on the right is from the Map Tool. Click on the images to expand them, and take a few minutes to compare the different maps.

Evacuation Maps: Features

The PRSN website includes a repository for all of the municipal evacuation maps. To find your map more easily, they are divided into the following categories: North, South, East, West, and Virgin Islands.

Once you find your municipality’s evacuation map and click on it, you will be able to choose whether you want to view it online or download it for printing or saving as a digital file.

See the images below for reference.

Map Tool: Features and Capabilities

The Map Tool is an online interactive map, which includes features that make the map more user friendly. PRSN has also developed a user manual for the Map Tool, GIS Web Application Manual, and it is available on the Tsunami Program home page.

Key Features

Zoom: Zoom in and out of the map

Legend: Generate a legend of the symbols appearing on the map

Layer List: Choose which symbols appear on the map

Draw: Draw lines, add text, and add symbols to the map

Map Gallery: Choose different map styles

Print: Print a selected portion of the map

Measurement: Measure distances and areas on the map (see the second video below for more on measuring and calculating distance)


Watch the video below to learn about the different interactive features in the Map Tool!

Map Tool: Measuring Distance

One of the key features of the interactive Map Tool is the distance measurer. This feature allows you to measure the area of a drawn shape and the distance along straight lines, with several different units available. Importantly, finding the distance between two points on the map will allow you to calculate how long it would take to walk that distance; you need to know this to be prepared for a tsunami. For example, you can use this feature to estimate how long it would take you to leave an evacuation zone from your home and reach an Assembly Point. If there are no Assembly Points close by, it is recommended to move to the nearest high ground.


Watch the video below for an example of how to use the distance measurer to:

  1. Measure distance along straight lines.
  2. Use the measurement to calculate how long it would take to walk that distance.

The calculator used in this video is not part of the Map Tool features.

The steps performed in the video for calculating the time to walk a distance are listed below. “These steps and this equation use miles.”

    1. Measure the distance (miles) between two points
    2. Divide the distance (miles) by the average walking speed of a person, about 2.5 miles per hour
    3. Multiply by 60 minutes

The steps above written as an equation is:

This image is the equation for the steps described above to calculate how many minutes it would take to walk a distance.

You can practice your evacuation route twice a year during PRSN’s community events: the Great ShakeOut in October and the Caribe Wave Exercise in March.

Knowledge Check

Test your knowledge about this topic by answering the following questions. You can review the correct responses by hovering your mouse over the boards with the word “Answer.”  Some questions require reviewing images.

1.  What does the Map Tool allow you to do that the evacuation maps do not?

Answer

It allows you to use various interactive features, such as zooming in on a particular location (for example, your neighborhood).

2.  Which Map Tool feature would you use to create an evacuation route from a specific starting point?
This is a screenshot of the Map Tool with an outline along the established evacuation route from a location marked "Home" to the nearest assembly point.

Answer

The Draw Tool

3.  Why is it important to determine the distance to an assembly point (or nearest high ground) and the amount of time it would take you to travel that distance?
This is a screenshot of the interactive Map Tool using the measure tool to outline the evacuate route from a house in the Mansion del Mar community to the nearest assembly point, outside of the yellow evacuation zone.

Answer

During a tsunami event, you will need to walk this route. Knowing this information ensures you will be better prepared to respond to a tsunami.

Apply

See the notification box below to apply what you learned.  Afterward, you can choose to continue with the next module or take a break and come back at another time.

Open the Map Tool on the PRSN website, locate your home or work; then, locate the nearest assembly point. Measure the walking distance between your starting point (home or work) and the assembly point. Follow the instructions in this module to estimate how long it would take you to reach the assembly point from your starting point.


If there is not a nearby assembly point, pick a location on the nearest high ground outside of the evacuation zone.